Saturday, December 21, 2013

It's beginning to look a lot like... oh goodness, it IS Christmas!!


Tis' the season for massive amounts of gift wrapping and if you are like me you have waited until the very last minute to do it.  I remember my Dad teasing me because every Christmas Eve I would be doing all, and I do mean ALL, of my Christmas wrapping.  Though I do the bulk of my wrapping throughout December,  I always save a few presents to do on Christmas Eve because now it is just a tradition.  

So, if you are a procrastinating traditionalist like myself then these last minute printable gift tags are for you!

Step 1:  Print off and then cut.  


You can simply cut them into squares or you can round the edges like I did to this one. 


After this tag I felt like I was overachieving a bit, so plain squares it was for the rest of them!

Step 2:  Gather gift wrapping supplies.


This step had me questioning my children multiple times asking them where they hid various items.  
"Where did you put the tape?" 
"Were you playing with Mommy's string again?!"  
I found out every single time that it was me that misplaced every single thing...
not my proudest Mom moment.

Step 3: Wrap present.


I'm not the best wrapper, so instead I will show you the finished product.  Ta-d... oh man, there's a crease!!

Step 4:  Attach gift tag.


I tried to cover that darn crease, I really did.


Feel free to download them here 

P.S. If you would like to try designing some yourself, 
you should definitely try out PicMonkey!

HAVE A  VERY MERRY CHRISTMAS!!


Thursday, November 7, 2013

Baby Shower Game Printables


I have a confession.  I've been having a pity party for the past couple of days... and not even a good one.  It was celebrating basic everyday things like how I have a cold, how the kids have colds, how none of them have been sleeping through the night, how I haven't been sleeping through the night, etc.  There wasn't even Ben & Jerry's, and it's just not a good pity party if Ben and Jerry aren't there.

Anyways, I've been so self-involved that I haven't even visited my little blog for a couple of days. So, I'm finally cancelling the party (it was a stinker anyways) and I'm going to post about something I love.  Something that always makes me happy... 
BABY SHOWERS

FREE PRINTABLES
(cause honestly, who doesn't love babies?  and free printables?  It's really a win-win.)

I had the pleasure of attending a baby shower a couple of weeks ago.  Like I said, I love baby showers!  The clothes alone are enough to send me into a fit of OOoooh's  and AAaaaww's.  Might I insert here that boy clothes have gotten SO much cuter since I had my boys.

For this shower I was asked to prepare a couple of games.   I found this game from the blog PINK TEA that I absolutely loved.  I thought it was so creative and would be a fun game for the party. Since this shower was for a baby boy, I wanted to create a printable that had boyish colors... and then I designed one that was a little more girly just for fun :).


Feel free to download this printable HERE


Feel free to download this printable HERE

(The answers for this game are as follows: 1. Green Eggs and Ham 2. Goodnight Moon 3. Velveteen Rabbit 4. Three Little Pigs 5. Sleeping Beauty 6. The Ugly Duckling 7. Are You My Mother? 8.  Brown Bear, Brown Bear, What Do You See?  9.  Where the Sidewalk Ends 10. Go Dog, Go 11. The Very Hungry Catepillar 12. The Cat in the Hat 13. Where the Wild Things Are... there is also a 14th question that I couldn't fit in, so go check out the Pink Tea blog to find out what it is!)


The next game I came up with was a game I like to call: 

"Can You Guess, More or Less?"

For this game you will need to buy some baby items (Make sure to keep the receipt, you will need it for later!)  I bought eight items and I tried to keep them roughly around the same price, within one or two dollars.   Then, calculate the average cost for all the items.  Mine came out to $3.74.   

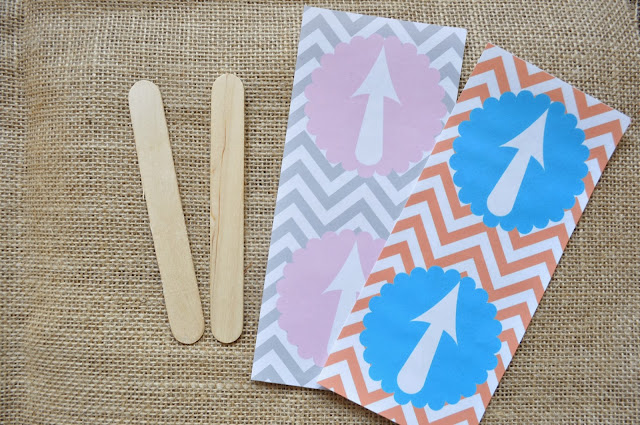
At the shower each person gets an arrow paddle, with the arrow pointing up on one side and down on the other.  

Take out one item at a time and ask them to raise an up arrow if they think the item's price is MORE than the average price or a down arrow if the item's price is LESS than the average price.

The person with the most correct answers gets a prize!

To make the paddles, simply print out the arrows
*I print two images per page*
Feel free to download this printable HERE

Feel free to download this printable HERE

Once you have your images cut out, gather some jumbo crafty popsicle sticks and glue. 
*I used peel and stick glue dots because the are just so darn easy to use.*

Now just fold your cutout arrow image in half.


Next, glue the popsicle stick in the middle...


and you're done!  


Seriously, baby showers are just the best :).  Now I'm off to locate some Ben and Jerry's.  My pity party may be over, but my craving for delicious ice cream is eternal.

Happy Crafting!!

Wednesday, October 30, 2013

Ch-Ch-Changes!

Hey Readers! 
**I'm not entirely how many of you are still checking in, but if you are thanks for being awesome :D**
I've decided to give the old blog some much needed updating.   I'm slowly learning all the fun (or not so fun) technical stuff that goes along with that, and it is turning into quite the process....one that sometimes takes longer when I have three wonderful kiddos that often need my attention. We've had enough poop painting and toilet tea parties this week **My children are very talented,  I just wish they would start using different outlets for said talents** to make me realize that updating might take awhile.  My goal is to be done by the middle of November, so if you see things changing on here it's just me tinkering away.  Thanks again for stopping by... Awesome Awards for all!


Friday, October 25, 2013

Printable Halloween Treat Labels


My children are getting quite excited for Halloween.  They have been counting down since September, so you can imagine the sheer joy they expressed when I told them it was less than a week a way.  My ears are still ringing from the shrieking... literally.

I've always been somewhat of a procrastinator... in all honesty I probably should omit the word "somewhat".  Since we are less than a week out, I thought I would make some fun printables for those (ME) that are doing any last minute projects (Again, ME. But, hopefully through this I can find some people that procrastinate as much as me and maybe we can be procrastinating buddies... ... ...Anyone?).

So, here it is:


Feel free to download this HERE.

I used these for two different projects. 
 For the first I made treat jars to hand out to some of our neighbors.  I printed out 2 of the image per page ( 8 circles total) so that they would be smaller.  I then cut them out and glued them to a scalloped circle, and then onto a folded paper rosette (for which I used this tutorial.  Seriously, make some right now.  They are so fun!)


I had so much fun making the rosettes, I decided to make some larger ones to hang on a wall in our home that was needing some holiday decoration love.  This time I just printed out 1 image per page because I wanted them larger for this project.

I cut out the shapes and glued them on some scalloped circles (my husband just got me a Sizzix, thus the many scalloped circles... I may have a problem.)


Then I glued them on the folded paper rosettes...


and hung them on wall.  I love them, but I love not having a bare wall even better!


Happy Halloween!

P.S.  Here's one more printable, just for fun.  Enjoy!


Feel free to download this HERE.


Sunday, October 20, 2013

Julia Child is my favorite...

Whenever I peruse around Pinterest I always gravitate towards Julia Child's quotes.  I love them all and have yet to come across one I didn't. So, when that time of night rolled around where the kids were in bed and I had a little time to myself, I decided to play around on PicMonkey for a little bit and have fun designing one of her quotes that is my absolute favorite.


Couldn't have worded it better myself, Julia.

**You can download this image HERE**


Friday, October 18, 2013

Halloween Decor on a Budget


The holidays are always hard for us budget wise when it comes to decorating.  I usually make a list of things that need to be bought for a particular holiday, and decorations are usually at the very bottom.  For this Halloween in particular we have not one but TWO Trunk-or-Treats we are participating in.  We also had to factor in the candy we needed for anyone who stopped by our home, so a big chunk of our budget went towards candy.  Our two boys outgrew their costumes from last year and we had another little one to buy an outfit for, so another chunk of our budget went to replacing costumes (P.S. They are adorable!).  By the time all of those things were taken care of we had a small amount left for decorations.  I turned to my husband that night and said, 
"I'm giving myself a $10 budget for decorations... and I'm sticking to it!".  

I set out to do just that. 

The first thing I did was stop by JoAnn's.  It is absolutely crazy how early each holiday's decorations get put on the shelves!  I'm already seeing Christmas decorations and it's not even past Halloween. ANYWAYS..  As much I am annoyed by it, it also means that the Halloween decorations go on sale quicker.  When I went they were already 50 percent off.  Awesome!  I figured I would use half of my budget at JoAnn's for pre-made decorations, and half on supplies for making some decorations myself.  


A small pack of cobwebs with spiders (around $2.50) was enough to cover our entire porch and even have some leftover for other parts of our house.


I realized later I probably could have made this door banner
 (also around $2.50) with stuff I had on hand, but it was much easier to buy it and still SUPER cute!


I decided I wanted to use the remaining budget to make something fun to hang on our front porch.  I came up with an idea for hanging 
bats/ ghosts/pom-poms decorations.  All the materials costed around 5 dollars and I had a TON of supplies leftover.


To make these I decided to use some diaper boxes to weight the cutout... and I had A LOT laying around.


Then, I traced some bats and ghosts for my shapes but you could do any shapes you wanted.


I cut the shapes out and then used them as a stencil for the felt.
I cut the felt out about 1/4" bigger than the stencil.  You will be making a sort of felt/cardboard/felt sandwich, so you'll want to cut out TWO felt shapes for every ONE cardboard shape.

I grabbed my trusty glue gun and hot glued the cardboard cut out to the first piece of felt.


At this point I attached my length of string.  I tried to glue at least 3-4 inches onto the cutout so it would be well anchored.

Next, I glued my second piece of felt to cover the other side of my diaper cardboard. 


** This was my first one, and at this point I didn't glue the string in between the felt/cardboard. 
 Let me tell you that anchoring it that way IS A MUST. 
 I had a couple of casualties that I am still unable to talk about. **

Next, I made a TON of pom-poms. 
(Super easy and fun! I used this tutorial.).


There are only 5 here, but I made around 40!


Ready to thread on the pom poms!!  I simply thread a large needle the top end of the string.  This string was pretty thick, so a simple knot was all that was need to hold the pom pom in place.  I would tie a knot where I wanted a pom pom to be placed and then use the needle to thread the line through the pom pom, letting it finally rest on the knot.   


Tie a knot, thread the pom pom, repeat.

Then, voila!
  

Very inexpensive, and they turned out oh so cute!


What are some ways you decorate on a budget?

As always, 

Monday, September 30, 2013

Quilted State Silhouette

We recently decided to redo the paint and decor in our master bedroom (and when I say "we" I really mean "me", for it was not at all my husband's idea.).  I loved the art that was above our bed (which you can see here) but I have three young children who can often cause mass destruction, and are above bed decor was one of their most favorite targets.  I realized it was time for it to go and since then have been trying to figure out what I should put in it's place.  I've always loved the idea of doing state silhouettes.  We are a military family and have lived in many wonderful places and I thought it would be the perfect way to remember each of the states we at one point called home. 


For this craft I used:

A burlap canvas
(mine measures 12X12 inches and was 
purchased at Wal-Mart for under $5)

freezer paper

fabric of choice

single-sided fusible batting

button, or other embellishment

acrylic paint


I was SO excited when I found these burlap canvases.  They were exactly what I was looking for and look how awesomely thick they are!


I am fastly discovering all the amazing uses for freezer paper.  This time I used it to cut out my image for the state of Utah.  After printing off the image I was using onto freezer paper, I simply ironed it onto the front of the fabric.


Next, I just cut around the image.  


I realized later that it probably would have been a lot easier to iron on the whole sheet of freezer paper, instead of cutting the shape out before hand.  At least it will be easier next time around!

I love how easily the freezer paper just peeled off... oh freezer paper, I am falling fast in love with your crafting capabilities.


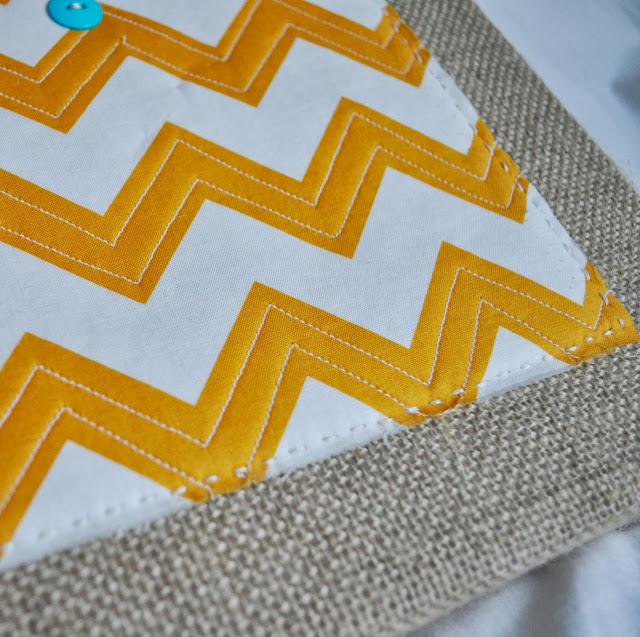
To accomplish the quilting, I fused the single-sided fusible batting to the back of the sihouette (making sure that the fusible side faced the fabric.).


I decided to just quilt along the chevrons.


 After I finished, I attached the silhouette onto the burlap by stitching a simple running stitch along the edges.  I placed the button roundabouts where the city we lived in was.


I decided that I really wanted to include the name of each state with each silhouette so I used another freezer paper stencil to paint the name on the side of the silhouette (find out how here).


 I am so excited with how these turned out and can't wait to do the other three! 

As always,  
HAPPY CRAFTING!

Linked to:

Tuesday, September 24, 2013

Freezer Paper Stenciling

This upcoming Saturday is my church's women's broadcast.  I am so excited to be able to spend time eating a delicious dinner with wonderful women and then be spoken to by, what I am positive will be, some amazing speakers.  Every year they ask for volunteers to set just one table for the dinner.  There are multiple volunteers that decorate, and it's so fun to see all the different kinds of table themes everybody comes up with.   This year I decided to volunteer!  It may have had something to do with the fact that I have had oodles of projects that I have wanted to do (I blame Pinterest), and this was the perfect excuse to do them.

The main craft that I wanted to try out was freezer paper stenciling. I've seen lots of people use this for baby onesies or decorative pillows and they turn out so cute!  Since the theme for my table involved burlap and lace, my goal was to stencil some custom designs onto some of the leftover burlap I had. 

For this craft you will need:

Freezer Paper
(I found mine by the canning supplies... who knew?)
Fabric of choice
(I chose burlap)
Exacto knife
Iron
Paint and paint brush

First, I designed an image in PicMonkey (my favorite photo editor).


I knew I was going to be cutting this out by hand and I wanted to keep it really simple and sweet.


Next, I cut a piece of freezer paper to 8.5 x 11 inches.  I love that you can put freezer paper in the printer!  Make sure that you have it facing the right way.  You want it to print on the paper side, not the waxy side.


Ready for the cutting!  All I had for a mat to go underneath was a stack of cardstock.  Use whatever works!


Cut along the outline of the letters.


It took me awhile to get used to using the Exacto knife, but after a while it got easier and a lot more fun!

Next, I ironed on the cut out images to the burlap. I put my iron on the hottest setting and made sure the waxy side was on the fabric.
When you iron the freezer paper the waxy side adheres to the fabric and seals all the edges so no paint gets through.  So cool!  I only had to iron the paper for a couple of seconds before it adhered to the burlap.

I had three different cutouts for this image:  one for the border, one for the words, and one for the inside of the O.  I did these one at a time, just so I could place them more accurately.


Ready to paint!  Just paint in the open areas like so...


By this point I was so excited I didn't even wait for it to dry all the way.  After a couple of minutes I took it right off.


Oooh!  I just loved how it turned out... so much so that I made two more to go with it.


I will definitely be trying stenciling again!
Happy Crafting!


Linked to: