
Welcome to Day 16 of the
Crafting Over Sweeting Challenge.
Sweets eaten: Nada.
I even made s'mores (my FAVORITE sweet) for our family dessert last night and didn't eat any.
Can I get a "Woo-Hoo!"?
Sweets craved: S'mores... obviously :D.
Today's featured craft is:
 These are so simple, so cute and so versatile.
In this tutorial I use them in clips, but there are so many awesome ways you could use them. One of my future projects will be to do these in red and white for a Christmas garland....
so excited!
For this craft you will need:

1 sheet of felt
Buttons
*any that suit your fancy*
Embroidery thread & needle
Hair clips
*any hair supply store will carry these.
You will also need ribbon if you want to cover them.
Here is an excellent tutorial on how to do that.*
Scissors
Rotary cutter, quilting ruler, and rotary cutting mat
*or a ruler and scissors, the above items just make it a little easier*
Glue Gun
Start by cutting a 3"x 3" square

Keep cutting squares, decreasing their size by 1/4"
(3" square, 2 3/4" square, 2 1/2" square, etc.)
 Your last square will measure 1" and
this is what your finished pile of felt squares will look like...

Now you're going to shape your squares into flowers.
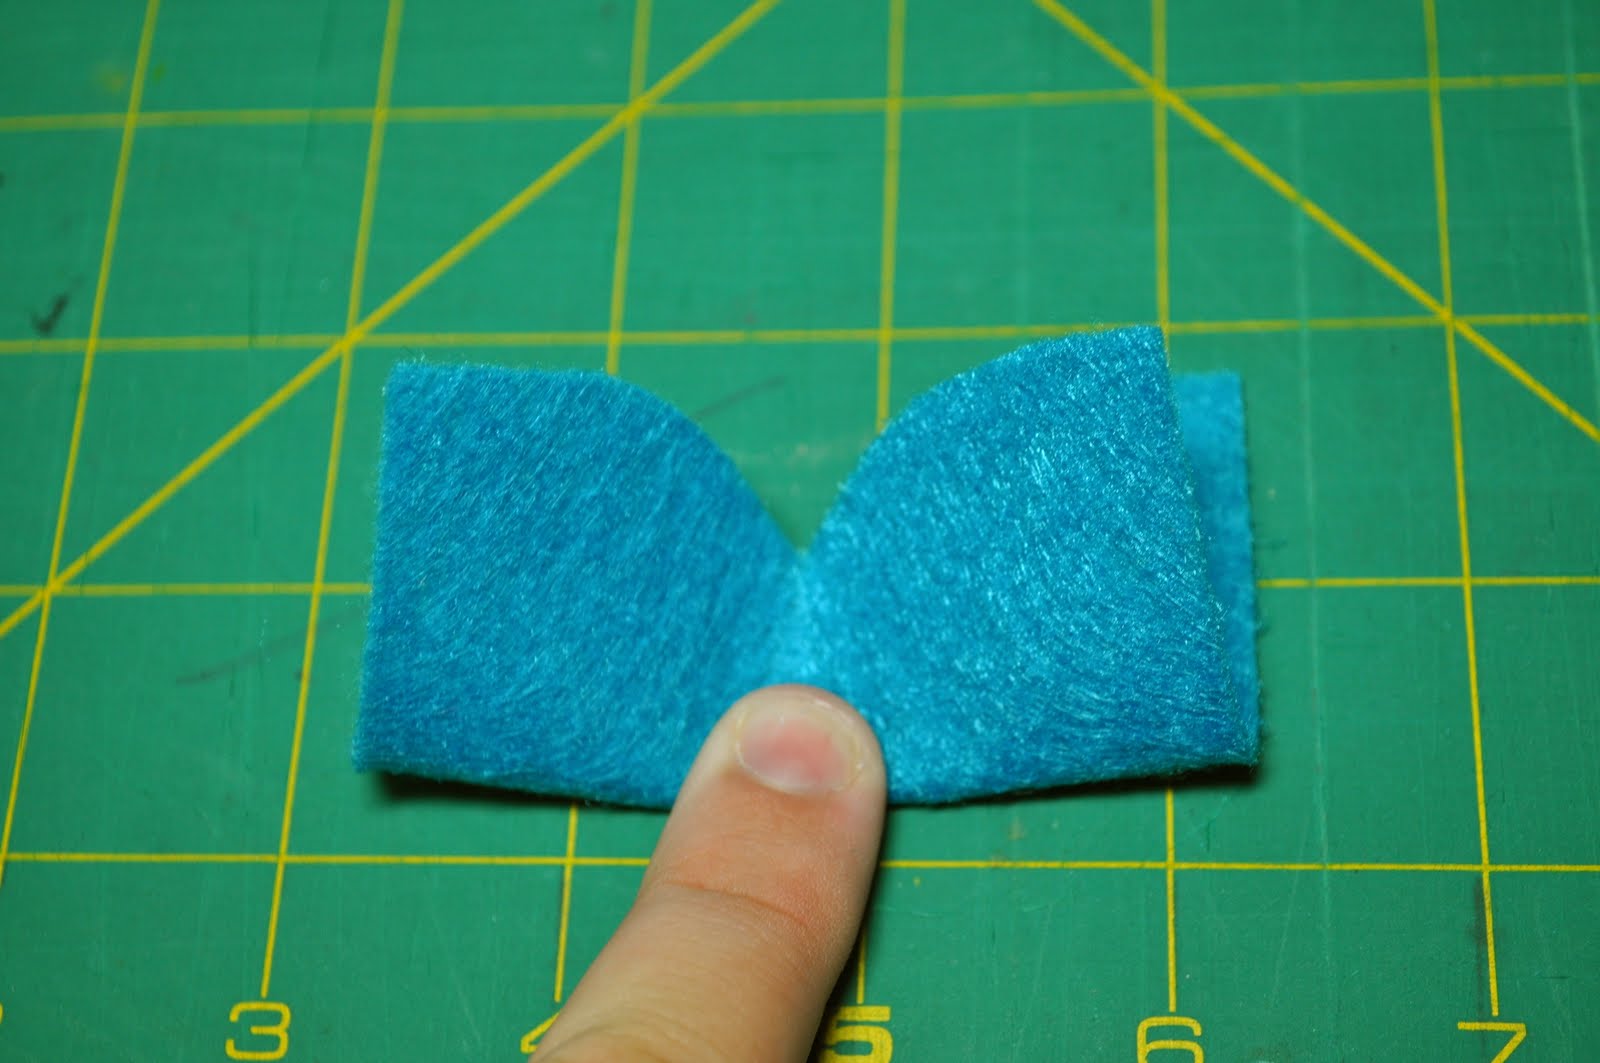
Take a square and fold it in half.

Cut the folded edge so it's curved, like so...

Then do the other side.

Unfold, then fold so the cut sides are together.


Cut the two edges like you did before.

and Voila!

Repeat these steps with the remaining squares
and you get a lot of scraps,

and a beautiful flower.

Sew together the flowers in the middle
and attach your button of choice.


Tie your embroidery thread in a knot on the back of your flower.

Hot glue your clip to the back of your flower.
**Update: At this point in the post I did a "Helpful Tip", that was more me
voicing my frustration than an actual tip. My issue was that the ribbon covered clips
always seemed to slip out of (my) hair more than the the non-covered clips did.
Thanks to a comment from Kayla, I now know how to avoid this.
Check out Kayla's awesome comment below
to see how to keep your ribbon covered clips from slipping.**
Sweets eaten: Nada.
I even made s'mores (my FAVORITE sweet) for our family dessert last night and didn't eat any.
Can I get a "Woo-Hoo!"?
Sweets craved: S'mores... obviously :D.
Today's featured craft is:
 These are so simple, so cute and so versatile.
In this tutorial I use them in clips, but there are so many awesome ways you could use them. One of my future projects will be to do these in red and white for a Christmas garland....
so excited!
For this craft you will need:

1 sheet of felt
Buttons
*any that suit your fancy*
Embroidery thread & needle
Hair clips
*any hair supply store will carry these.
You will also need ribbon if you want to cover them.
Here is an excellent tutorial on how to do that.*
Scissors
Rotary cutter, quilting ruler, and rotary cutting mat
*or a ruler and scissors, the above items just make it a little easier*
Glue Gun
Start by cutting a 3"x 3" square

Keep cutting squares, decreasing their size by 1/4"
(3" square, 2 3/4" square, 2 1/2" square, etc.)
 Your last square will measure 1" and
this is what your finished pile of felt squares will look like...

Now you're going to shape your squares into flowers.
Take a square and fold it in half.

Cut the folded edge so it's curved, like so...

Then do the other side.

Unfold, then fold so the cut sides are together.

Cut the two edges like you did before.

and Voila!

Repeat these steps with the remaining squares
and you get a lot of scraps,

and a beautiful flower.

Sew together the flowers in the middle
and attach your button of choice.


Tie your embroidery thread in a knot on the back of your flower.

Hot glue your clip to the back of your flower.
**Update: At this point in the post I did a "Helpful Tip", that was more me
voicing my frustration than an actual tip. My issue was that the ribbon covered clips
always seemed to slip out of (my) hair more than the the non-covered clips did.
Thanks to a comment from Kayla, I now know how to avoid this.
Check out Kayla's awesome comment below
to see how to keep your ribbon covered clips from slipping.**

So pretty!

Here's a second, smaller one I made with a ribbon covered hair clip.

These are so much fun, and like I said you can do so many things with them.
Get creative, and like always
Happy Crafting!
Linked up to:
Blue Cricket Designs
Lil' Luna
Sew Much Ado
Sweet Little Gals
Fabric Bows and More
seventhirtythree

If you buy that non slip cupboard stuff and put a tiny piece inside the ribbon lined clips it helps prevent slippage.
ReplyDeleteThanks Kayla! I've been wondering about that for awhile!
ReplyDeleteThanks Sara! Just linked up to your site... I'm pretty sure we are color soul mates. Turquoise is my absolute fave and I'm having so much fun looking at all the different projects!
ReplyDeleteI loved these liza...normally I don't do much crafting but I went out last night and bought felt, buttons, and hair clips. I think I have made over a dozen of them so far, some for Emily and Autumn and others for Christmas gifts. They are so easy, yet so cute!
ReplyDeleteOh my goodness Meredin, I was so excited when I read your comment! They ARE super easy and are really perfect for Christmas gifts. Just to hear that you made them made me happy :).
ReplyDeleteThese are really cute! However I don't wear a lot of clips in my hair, so I think I will adapt them for my Christmas wrap in place of bows.
ReplyDeleteThis comment has been removed by the author.
ReplyDelete